By Preston Bankson,
Learn how to resize range pick-up brass into obscure and expensive calibers.

USA –-(Ammoland.com)- I was at a crossroads last fall when considering a new rifle. I wanted something that would allow me to get into the long-range shooting game as well as harvest medium-sized game — mostly whitetail deer. I settled in on the 6.5mm bore diameter but had to decide which particular chambering. As I was definitely going bolt-action, I figured I’d get what velocity I could before approaching magnums as I didn’t have the need (or budget) for them.
The now ubiquitous 6.5mm Creedmoor was looking like the obvious cartridge to select. Before I could pull the trigger, I found out about the .260 Remington, whose parent case is the .308 Winchester. After some reading and shopping around, I found out that there are still a number of rifles chambered in .260 Rem, that the cartridge is reliable, and has slightly more capacity than the 6.5mm Creedmoor. On top of all that, I could use .308 Win brass. Pause. I could use my nearly endless supply of .308 Winchester brass? The free stuff I have accumulated from years of diligent brass pickup at my local range? This stopped the show. As a reloader, this brass recycling meant I would save hundreds of dollars over the life of this rifle and would spare me the trouble of beginning to amass stores of the expensive, and relatively new, 6.5mm Creedmoor brass.
So, I decided on a Tikka CTR chambered in .260 Remington. Coming up with the brass for it began a pretty big adventure considering that I had never annealed, neck turned, or necked brass up or down. The rest of this article will focus on the boiled down process that I follow.
Researching case conversion procedures, I found lots of fragmented information about steps you have to perform. After some experimenting, I figured out how to streamline things into a pretty efficient process. I wanted to share my learnings because I’ve gotten surprisingly good results. I have taken a relatively inexpensive hunting rifle (three digit price tag) chambered in .260 Rem utilizing converted .308 brass (largely mil-surp) and ended up with significantly better than expected group sizes. I have created dozens of loads that will shoot three-shot groups at or under .5 MOA and five-shot groups at .75 MOA. My few pet loads deliver performance superior to those just mentioned and, except for some particularly bad combinations, all loads I have used in converted brass will shoot five-shot groups at one MOA, which is still better than the manufacturer’s baseline three-shot group in one MOA using match ammunition. Again, this is using (basically) free, .308 Win brass with random loads – NOT .260 brass loaded to match ammunition standard.
Step 1: Sizing the Cartridge
To begin, I full-length size the parent cartridge so that I have a known starting dimension (remember most of my .308 brass is range pickup). This also sets the width of the case body to what will be the final dimension, which is common between the .308 and .260.
Step 2: Necking Up or Down
Next, we need to fatten up or slim down that cartridge mouth to the new bullet diameter. My favorite way to do this is to start with a Redding Body Die in the new caliber – for me, that’s .260 Rem. Forcing the brass through this ensures that the body diameter is sound, while, more importantly, shoving back the shoulder to .260 Remington spec. Note that this step does not size the neck but does bring the neck diameter down dramatically from .308 very close to .264, as a result of ensuring the shoulder is angled and pushed back correctly. This completes the largest amount of brass working that we will need to do.
I will note that I use lube during this step. While cases don’t tend to get stuck at this point, it definitely makes this step work more smoothly. Additionally, if you are converting up or down more than two or three bullet diameters, it’s a good idea to “ease” the brass into the new dimension using multiple steps. For example, when I convert .308 brass even further down to .243 Winchester, I push the .308 brass through a .308 sizing die, then a .260 Remington die, then finally the .243 Winchester die.
Step 3: Annealing
I mentioned a moment ago that we just “worked the brass” a lot. Without getting into too much detail let’s consider it like this – we already know that each time we fire a cartridge and resize it, we are hardening the brass. And, at a certain point, the brass will become so hard and brittle that is will break, split, separate, etc. That happens under ‘normal’ conditions. So, let’s take our dramatic re-shaping that just occurred. It’s much more stressful on the brass, and we need to release some pressure. What’s more relaxing than a nice sunbath and massage? A blowtorch! Duh.
As this step demands attention to detail, I will shut up before trying to describe this step completely. That’ll take an article on its own that we’ll get to soon.
When learning about annealing, I read lots of accounts of people applying heat less than responsibly to their brass. This, like many other oversights in reloading, could blow up your gun and seriously injure you. Hands down the best single source of annealing information that I found (that is not copyrighted) is here at 6mmbr.com.
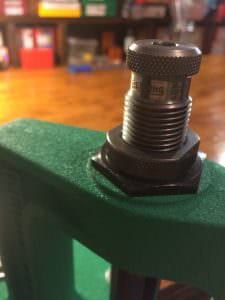
Step 4: Sizing Again
So now that we’ve done most of our brass re-shaping and released built-up tension in the metal, it’s time to perform our final sizing and reintroduce some rigidity to neck and shoulder. Because of my process, which separates the body sizing and neck sizing, I now only need to neck size my brass. Interestingly enough, I prefer the Lee neck sizing die which uses a center mandrel and compresses from the outside. This leaves the inner diameter of the neck perfectly symmetrical from the mandrel. Lee sells slightly thinner and thicker mandrels per caliber to allow you to adjust your neck tension. If it were worth the money for me, I think a more expensive bushing based neck sizing die would be a wonderful upgrade – but I haven’t jumped for one yet. I will note that I am not a fan of neck sizing dies that use an expander ball to set the final neck diameter. I know RCBS neck sizing dies utilize this function, along with all full-length sizing dies that I own.

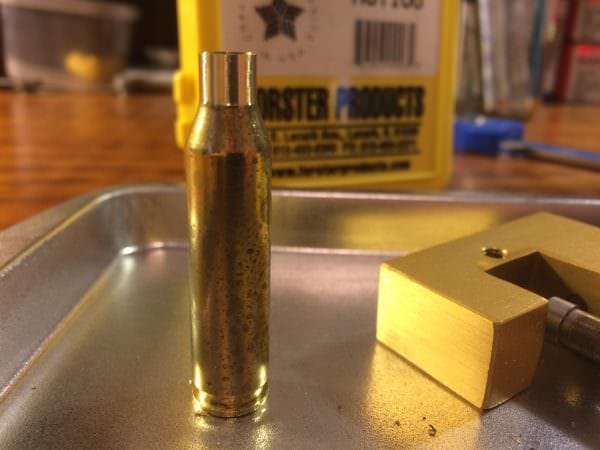
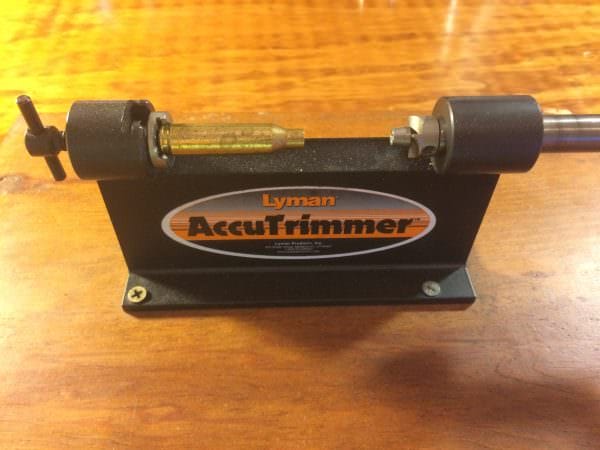
Step 5: Trimming
With the neck sized we’re ready to trim. In summary, this step ensures safe chambering as well as provides a consistent amount of brass to bullet tension amongst your batch of ammunition. For example, we do not want one case to .010 inches longer than max brass length and one case to be .020 inches below max brass length. That variation of space in the chamber plus the differences in neck tension can have a negative effect on our consistency and therefore a negative impact on our accuracy.
Additionally, this step deserves some attention as it sets us up for our next step, neck turning. Most neck turning devices index off of the case mouth. So, if the cases are consistent from base to mouth (we are ensuring through trimming) and shoulder to mouth (should be because of our sizing steps) then once we dial in our neck turning device for the first case, we can churn and burn through our entire batch of brass without any tweaks!
Step 6: Neck Turning

Depending on which cartridges you are converting to and from, the neck wall thickness could be an issue. In summary, let’s examine the .260 Remington with a .264 bullet diameter. If a particular .308 Winchester piece of mil-surp brass in has a neck wall thickness of .018 inches, and I convert this brass and then insert my .264 bullet I have a total neck diameter of .300 of an inch (.264 + .18 of brass on each side of the bullet). Unfortunately, the SAAMI spec maximum neck diameter for this cartridge is .297 inches. What this means is if I jammed this reload into a typical .260 Rem chamber, there is a good chance it simply would not fit based on this measurement alone because it is oversized. Additionally, I guarantee you that it would not fit a match chamber which could allow a maximum neck width dimension below SAAMI spec, if the owner so desired.
So, the solution to this is to uniformly shave a thin layer brass from the very end of the case mouth all the way down the neck and just barely into the top of the shoulder. I use the Forester Hand Held Outside Neck Turner, which has trimmed smoothly and uniformly. I also ordered a cheap tube micrometer (~$35 on Amazon) to measure my neck thickness and ensure uniformity. Your typical reloading calipers will not be able to find the detail of measurements here that the tube micrometer can.
As a sidenote, this step increases the consistency (and therefore accuracy) of your rounds whether converting brass or just adding this step to your normal brass prep. Step four smoothed the inside of our neck wall and pushed any irregularity in the brass shape to the outside of the case neck wall. Thus, when we neck turn from the outside of the neck toward the center, we remove any high spots and uniform the entire neck wall. This piece of brass is now more uniformly applying pressure on our bullet as well as expanding to meet the chamber wall when the gun is fired.
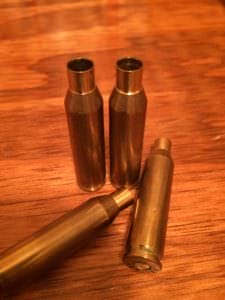
Step 7: Fire-Forming (Case-Forming)
Our final step is fire-forming the cases to fit the chamber of the new cartridge. For anyone thinking “this sounds dumb, we’ve already body and neck sized this case – it should be ready to go!” I will give the example that the base portion of the shoulder on my converted .260 cases is slightly too low (allowing excess headspace) before I fire-form the brass to this new cartridge shape. This step can be anywhere from somewhat unnecessary to absolutely crucial depending on your starting case dimensions and your final cartridge dimensions. As I haven’t performed every single one of the 16,728 (made up number) possible brass conversions, I cannot tell you if your particular conversion is imperative or not, so I have decided to perform this step during all of my conversions.
Boiled down, this step consists of putting the newly converted brass into your rifle chamber and putting the rifle into battery (closing the bolt) then enacting chamber pressure high enough to get the brass to expand to fit the chamber walls.
For many people who live in a rural area, this is as simple as taking your prepped brass, inserting a primer, add a safe amount of powder, add some cream of wheat as filler, seal with a cheap plug (wax, Crisco, etc.) and fire! You can find some detail on that process here.
Because I live in a city, I never have fire-formed without a bullet. The neighbors frown upon me loading it up and firing into the air in my backyard. So, I have simply loaded the brass up with a mild or medium load and used this first firing as plinking ammo. I note that I actually have had superb accuracy from some of these batches of first firings (when the brass isn’t completely to spec but is freshly annealed, and neck turned.) This being said, I would never recommend using non-fire-formed brass for hunting or match shooting.


I have just gotten in to case forming because of the 300 black out and find your article the best and most concise that I have read.I would love to find a 308 to 6.5 creedmore conversion! Thank you for your wonderful work!
@hotshottertom McHale, I like this Preston Bankson writer. I like his logic, I like his detail oriented descriptions, and I like his youthful humor. That was an informative and fun article to read.
Mr. Preston Bankson: I am seeking information on the process of converting 308 brass to the 338 Federal . I realize that expanding the case mouth of 308 brass .030 may need to be done in stages , after annealing of course. Is there a tried and true process that accomplishes this or can it be done in one fell swoop. I am very much interested in Bill Wilson’s offering of a barrel in 338 Federal that fits the AR10 platform, and with an abundance of 308 surplus brass available, the combination of the 338 Federal and a semi-auto action… Read more »
I’m in the process of producing some brass specificly tailored to a Rolling Block #5 that is a somewhat 7×57 chambering. The Latin American countries were replete with ammunition best described as 7mm Spanish Mauser, and the generous chamber required for those cartridges can do unfortunate stretches to standard 7×57 brass , in many instances rendering 7mm Mauser spent casings worked excessively in all the wrong places. I’ve just gotten a few hundred 30.06 certified once fired Remington test brass and the RCBS trim/form die to perform the worst of the reworking of the brass into 7×57 to start with.… Read more »
I have been reloading for several decades and this is probably the best
article I have seen In years. It took me a lot years to get this information from other shooters. I have shot pistol bench rest with Rem. XP’s with match chambers, that required turning necks.
Great article keep up the good work.