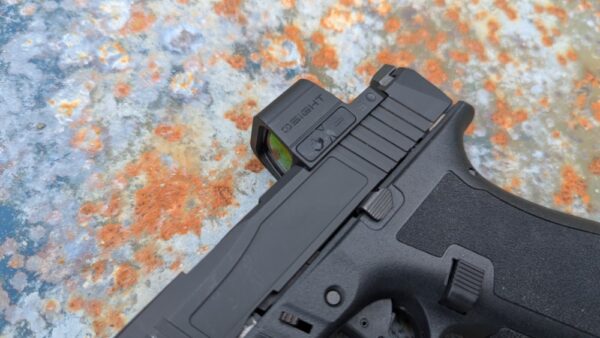
Moving from iron sights to a red dot on a handgun can be challenging for a lot of shooters. It’s not an easy process by any means. It’s a radical change that won’t deliver results on day one. In fact, you might find yourself shooting slower, with less accuracy at first. Don’t give up! To help you learn to make the most of your red dot, we have a series of red dot drills.

A red dot makes it easier to shoot faster, straighter, and further, but to see those results, you have to train. Train, practice, and optimistically seek professional instruction. The red dot drills I’m listing here are aimed at beginners and to help you transition from iron sights to a red dot.
I have five that should help you conquer your red dot-equipped handgun.
Live Inventory Price Checker
|
Holosun - HS507C X2 - 1x - 2 MOA Dot & 32 MOA Circle - Black - Red Dot Pistol Sight | True Shot Ammo | $ 364.99 |
|
|
Holosun HS507C X2 MRS Red 2 MOA Dot with 32 MOA Circle Open Reflex Sight | The Mag Shack | $ 309.99 |
|
|
Holosun HS507C-X2 Reflex Red Dot Sight 1x Selectable Red ACSS VULCAN Reticle Solar/Battery Powered Matte Black | MidwayUSA | $ 339.99 |
|
|
|
Holosun HS507C X2 Red Open Reflex Sight 2MOA/32MOA Circle | Palmetto State Armory | $ 299.99 $ 232.99 |
|
Handgun Red Dot Drills 101 – The Presentation
Many of our drills will focus on learning to see the red dot as soon as you draw and get on target. That’s the biggest speed bump most shooters are going to have when moving from iron sights to red dots. Most shooters will draw and fail to see the dot. The window might be on the target, but the dot is often high.

For that reason, we are going to do a simple presentation red dot drill. Start with your gun holstered with a B8 target at seven yards. You’ll need one round per run. It’s not generally too demanding. A shot timer isn’t necessary, but can be useful as a go signal.
The drill is simple: draw and present the firearm. Fire one shot on target. Keep your arms extended and gun oriented towards the target. We want to go slow and perfect the presentation. As you draw and your hands meet on your gun, you should be able to see the front sight in your vision with the barrel pointing upward.

Push the gun out, and as the gun orientates and levels, your eyes should find the dot. In fact, the dot should be on the target before you’ve fully pressed the gun outward. As you extend the gun completely outward, the dot shouldn’t leave the target.

After you fire your shot, keep your arms extended, and I want you to observe where the reticle sits. With a proper grip, your dot should settle back to the point you fired. This is necessary for consistency and to fire that accurate follow-up shot.
Repeat this drill, going a little faster every time.
The Reversal
Another great way to get better at finding your dot is to work the draw and presentation in reverse. Start with the firearm extended and the dot on target, then reverse the presentation, breaking it down step by step. This is a great drill to do dry, but can be done with live ammo as well.

Start in the ready position, on target. I use a B8, but you can use anything. With the dot on target, fire a shot, and then break the position down. Pull the weapon inward to the pre-presentation position, but try and keep the dot on target until the gun dips below your eyesight.

From there, you can reverse the draw and reholster the firearm. Now you can draw and do a presentation drill. Then, repeat the process: start in the ready, fire a shot, and then break the form down, constantly looking for that dot.
There are variants of this red dot drill that can be done from the low ready or other similar ready positions. Start on the target, then break it down to your ready position.

Repeat this drill and its variants until you can get the dot on target as soon as you can get the gun on target.
Taped Up Mozambique
Another big issue shooters have with red dots is forgetting that it’s a target-focused shooting method. A lot of shooters have had ‘front sight focus’ drilled into their heads for decades. That’s a hard habit to break. This red dot drill helps you transition to a target-focused shooting method.

Tape some blue painter’s tape and cover the front lens with it. You shouldn’t be able to see through the optic. The tape forces you to focus on the target. If you focus on the dot, all you’ll see is the blue tape.
Set up a man-sized target; a silhouette of any kind works. I’m partial to the FBI Q target. Take a position seven to ten yards from the target and start holstered or in a low ready position. We can sneak some presentation practice into this simple target-focus red dot drill.

At the signal, present your gun and fire two rounds to the chest quickly and efficiently, then transition to the headshot. Make sure you keep a target focus. If the target looks blurry, you are doing it wrong. With a target focus, the tape is a non-issue. The dot will bounce all over your target and be superimposed over your vision.

The Mozambique drill allows you to shoot quickly and with precision in one drill. It will show you the accuracy and speed capabilities of a dot when you focus on the target.
The Return To Target
For the next drill, you can ditch the tape, or keep it. It’s up to you. What you will need is one round and a two-inch dot target. I typically use a Dot Torture drill for this target. It gives me ten two-inch dots, so it’s perfect for this red dot drill. Shoot this red dot drill at three to five yards.

You can start in any position, and this is not a timed drill. Take your time and get your red dot centered on the 2-inch dot. What we’ll do now is fire one round and recover. What you should see is your dot streak and likely ‘leave’ the window as the weapon recoils rearward and upward.

As the gun and you recover from recoil, observe where your red dot rests. Optimistically, you want the dot to return back to the 2-inch dot. With a good grip and proper stance, it should return quickly and be somewhere in that dot. If your dot isn’t returning to the dot, your grip or stance needs to be worked on.

There is plenty of debate among shooters on the best way to grip a gun. I prefer a semi-tight grip with my hands pressing together against the grip. My arms are not fully extended, but bent slightly at the elbow. Picture trying to open a pickle jar; you aren’t going to try and lock out your elbows to open the jar.
Bring the gun in a little bit. Get that solid grip of your choice and practice until the red dot recovers back to the two-inch target.
War Hogg Tactical Five-Shot Red Dot Drill
We’ve covered a lot of basics, but our last red dot drill goes a little faster. This drill comes courtesy of Rick Hogg at War Hogg Tactical. We’ll need fifteen rounds per run, a shot timer, and a B8 target. If you don’t have a B8, a standard paper plate will work as well. You’ll start from the holstered position, so bring your holster of choice.

We are going to start at five yards. At the signal, draw and fire five rounds into the target. Note your time and misses. With this drill, you’ll want to check the time for each shot and record the time for each shot.
Now repeat the drill at seven yards, and once more at ten yards. At each range, you’ll review your shot timer and time for each shot fired. The goal isn’t to make a particular time, but to observe the data the five shots provide you. You’ll be able to see how fast you can draw and how fast you’re recovering after each shot.

The goal is to push your personal numbers down. You want to be better than your last time. This drill works brilliantly with a red dot because you can see your draw and presentation times, as well as your ability to recover and fire an accurate shot. It’s data-driven and allows you to document and diagnose your weak spots.
Seeing Red
Red dots on handguns are massively beneficial. After a little training and practice, it’s like a cheat code. For defensive purposes, it allows precision while remaining target-focused and keeping your situational awareness high. It’s the future of handguns, but if you’re not prepared to train, then it’s not for you. Train hard, train often, and be prepared.
About Travis Pike
Travis Pike is a former Marine Machine Gunner, a lifelong firearms enthusiast, and now a regular guy who likes to shoot, write, and find ways to combine the two. He holds an NRA certification as a Basic Pistol Instructor and is the world’s Okayest firearm’s instructor.


I wonder how he shot a “red dot drill” with a Glock 43x… Without a red dot mounted to it? 5th photo up from the bottom.