By Mike Seeklander


Geneseo, IL – (Ammoland.com)- I am often asked about my handgun carry position and the reason for my choice.
There are some subtle, yet important, differences in the defensive draw process versus the competitive draw process. There are several crucial steps to performing a lightning-fast concealed draw.
While drawing a handgun quickly under the stress of an attack is important, there are other critical factors in accessing your handgun. As it turns out, I covered this topic in detail in an article over on the Personal Defense Network blog.
It’s an excellent primer to what this post will go over. Let’s jump in.
The Concealed Carry Taste Test
In previous years, I always used some sort of strong-side carry method, including belt-type concealed carry holsters in leather gear made by Bianchi and Safariland, as well as duty holsters when I was a police officer in Knoxville, Tenn. I also carried in a custom shoulder holster for a bit of time after I moved on to the Federal Air Marshal Service and spent a significant amount of time in a seated position.
It was during that mission that I began to consider the downsides to carrying a handgun in the typical strong-side position, simply because accessing the gun while seated was so difficult. I began my first experimentation carrying in the appendix position at that time. In the end, I had key reasons I ended up picking the appendix position as my primary carry method.
Why Appendix?
The appendix carry position offers me more flexibility – the pros vastly outweigh the cons. Whether seated at a desk or in a car, it’s my position of choice. And with shorter, more compact guns like the XD Mod.2 Sub-Compact, comfort and concealment are not an issue. Appendix carry allows me to draw the handgun quickly, efficiently and with my support hand if necessary.
Finding the ideal holster that allows for safe re-holstering is a primary consideration when appendix carrying. If safety rules are violated in any way, you will get hurt. Years ago, I took a class with Todd Green that was specific to the appendix carry position. He taught a very deliberate method of re-holstering that stressed keeping the gun pointed in a safe direction at all times. In my own classes, I make students that wish to carry in the appendix position demonstrate safe re-holstering several times with an unloaded gun before allowing it in the class.
The bottom line? The one risk to the appendix carry position is that the gun can be pointed at the lower extremities while re-holstering if the shooter is negligent. This carry position requires attention to detail and training. If you are not committed to both, select a different carry method. Remember:
- Select a high-quality holster designed for IWB (“inside the waistband”) carry, and never try the appendix carry position without a holster.
- Keep the muzzle pointed away from your body while safely indexing the muzzle in the holster. Todd Green demonstrated a sort of “leaned-back” position of the upper body, constantly keeping the muzzle pointed away from the body.
- Keep your finger indexed along the slide – not in or on the trigger guard.
- Use the support hand to clear your cover garment.
- Be very slow and deliberate – there’s no rush to put the gun away once it is out.
The Appendix Carry Quick Draw
Drawing out of the holster, however, may call for a quick pace if someone is threatening you with violence. A fast and deliberate appendix-position draw from concealment requires some specific steps:
(1) Simultaneous Hand Movement

In this step, both hands move simultaneously. As the gun hand moves toward the concealing garment, the support hand moves to the centerline at chest level and prepares to greet the gun hand. Doing this will set you up for success in the next steps of the draw process.
Placing the support hand increases efficiency, avoiding “chasing” the strong hand with the support hand while trying to build the grip. The hands move at the same time and same speed. I am purposefully sweeping the cover garment with the gun hand and assisting that sweep with the support hand if necessary. I want to have the ability to draw the gun without using the support hand at all if needed, so I need to practice this action with both hands to be prepared.
(2) T-Shirt Sweep
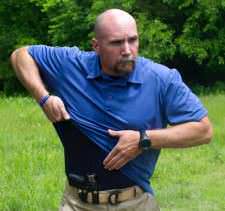
Sweep the t-shirt up and in a circular motion behind the gun. Bring the hand high through the center of the chest and just under the gun-side pectoral area, while keeping the thumb in contact with the skin.
The hand then traces its way around the side of the body, over and behind the gun position. You won’t pull the material of the shirt to the rear while sweeping – it just glides through the fingers while tracing to a position at the rear of the gun. This arc of movement mimics a “C.”
After the cover garment is swept out of the way, acquire a firm grip high on the grip of the weapon by indexing the gun from the rear. Allow the hand to slide high on the back-strap while unsnapping or deactivating any safety-retaining devices on the holster. (NOTE: This should be part of acquiring the proper shooting grip and not a separate movement.)
(3) Draw, Rotate, Meet and Greet

Draw the pistol from the holster. Once the muzzle has cleared the holster, begin to rotate the muzzle of the weapon forward until it is oriented at the threat. The wrist is locked, and the muzzle is in line with the wrist and forearm.
As the gun hand passes the support hand at the centerline of the body near the mid-chest level, the support hand indexes up under the trigger guard and begins to form the final firing grip. At this point of meet and greet, a firm two-handed shooting grip is established.
The shooter’s attention remains focused on the threat during the first three steps of this procedure. Pay particular attention to keeping the thumb flagged to allow the support hand to obtain a good grip during this step.
(4) Extend and Manage

Push toward the threat at the shooter’s eye level (line of sight). Begin to “prep” the trigger after the grip is formed, as the weapon is moving toward the target. The conscious decision to shoot has been made, and our goal is to get through some of the trigger manipulation before the gun gets to full extension. With double-action triggers, attempt to “roll” through the double-action stage by committing to it as the gun is extended.
The trigger will be “at the wall” at this point, and a smooth press is continued to the rear. Keep referencing the sights and verifying proper shot placement with either a direct and clear focus on the front sight and perfect alignment or a flash-sight picture (less focus and alignment) for closer shots.
Continue the steadily increasing pressure on the trigger. Follow through the shot by tracking the front sight and resetting the trigger during recoil, obtaining the next sight picture and determining if the threat is neutralized. If so, perform the proper scanning process. If the threat is not neutralized, continue to fire as quickly as shots can be fired into the combat-effective area.
Stay Tuned
Your carry and draw techniques are as good as useless without practice, so keep your eyes peeled for an upcoming post about training yourself on the draw process through repetition and skill-building.
For more tips, connect with me at www.Shooting-Performance.com or on Facebook.

What holster do you use on your show?
Appendix carry isn’t for everyone just as 4:00 isn’t my preferred style of carry. If you don’t like it or your body type doesn’t allow it, don’t do it. I started AIWB carry over a year ago and wouldn’t think of carrying my gun anywhere else for CC. The 4:00-5:00 position puts the gun behind my center line and I don’t like it. It prints easier when bending and is much tougher to defend a grab attempt. It is going to be a serious fight for someone to get my gun out of an AIWB holster. As most fights end… Read more »
At what point do you get used to a gun pointed at your crotch? And I can see how it would be fairly comfy while standing up, sitting down is a whole ‘nother thing with a 6″ long piece of metal and/or hard polymer stuck in the front of your pants, holster or not. The bottom of my belt is touching the top of my legs when I sit, so pushing anything further south than that will not be comfortable, not that a holster is supposed to be a day at the spa, but you know what I mean?
I’ll keep mine in the small of my back or on my side canted….That whole yanking up the shirt thing seems time consuming and you could have a VERY negligent discharge your last one that is! In Maine it’s usually what I call perfect weather 70-75 so untucked shirt and the way I carry you can’t see it and it’s quick access, however I don’t have to rip my shirt out from under my gut to get at my gun!!
What holster do you prefer Mike?
I use pocket holsters for my small frame 9mm’s. I wear coveralls and it’s handy and concealable. I have a I have a full size S/A XD-M and would like to use a shoulder rig but no one has any thing positive to say about the more common rigs.
Different strokes……
I’ll stay with my ‘Cross Draws’ and ‘Shoulder Rigs’.