by: Dave Kaiser
Looking for more advice on the best AR 15 triggers, check out our review of five trigger you should consider.

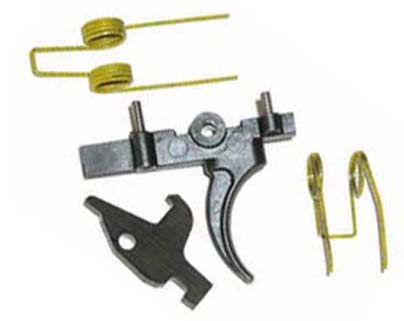
Brownells.com – -(AmmoLand.com)- JP Enterprises, Inc., has been one of our leading suppliers of AR-15 rifle accessories and one of the first suppliers that made available a fully-adjustable trigger for the AR-15. Their list of popular products include the triggers, lightweight hammers, sights and forend tubes. They produce aftermarket accessories for both Colt and other after-market receivers. The Adjustable Trigger Kit and the Low Mass Hammer featured here are available with either the .154” diameter pins or the .169” diameter pins.

The issue trigger and hammer used on Colt and other AR-15 type rifles and carbines leave a lot to be desired if you are a match rifle shooter or a varmint hunter. We even get calls from casual AR-15 plinkers complaining about the trigger pull. Remember, the AR-15 was designed as a battle rifle and to that end it has few peers. Almost every “factory” trigger is set up with a pull weight that will usually break somewhere between five to eight pounds, with significant amounts of creep and over-travel built in. That’s safe for the troops but not much fun to shoot.
The JP Trigger system employs adjustment screws located at the front and the rear of the sear/trigger that set both takeup and over-travel to the minimum. In addition, lighter-than-stock trigger and hammer springs are packed with the kit. The improved geometry used by JP along with these springs enable a lighter trigger pull to be easily obtained by anyone with the right tools and the time to follow the instructions.
Note: when doing any mechanical work or even when simply picking up any firearm, make absolutely certain that the chamber and magazine are empty and unloaded!

Please remember that the information contained here applies to the rifle used in this article, and may not be correct for an otherwise identical make and model of rifle that you may be working on. Conditions of use and wear as well as manufacturing tolerances on all of the parts involved will create situations unique to your individual rifle regarding parts suitability and fit.
The first step in working over the trigger of an AR-type rifle (after making sure it’s not loaded) is to remove the upper receiver and barrel assembly from the lower receiver. Lock a Brownells Hammer Drop Block into the magazine well, so you can dry fire the trigger mechanism without the danger of damaging either your thumb (catching the hammer as it falls) or the lower receiver wall ahead of the hammer. Most AR-15 receivers are made from aluminum, allowing the hammer to fall against the receiver will damage it beyond repair.
Clamp the lower receiver in a padded bench vise or one with Bronze Vice Jaws so you have access to the trigger and grip areas, and can get to the hammer and trigger pins. Closely study the function of the hammer, trigger and disconnector until you are completely familiar with how they work and why. In addition, examine the safety to see how it blocks the back surface of the trigger when the trigger is pulled with the safety “on”.

To help you understand the function of the disconnector, perform this simple function test. Cock the hammer by pushing it downward until it is captured by the sear. Pull the trigger and hold it rearward. Watch the hammer swing forward until it stops against the Hammer Drop Block (in actual function the hammer would strike the firing pin).
Keep the rearward pressure on the trigger and cock the hammer again. (You are now mimicking the function cycle of the bolt and carrier as they travel rearward after the shot is fired). As you push down on the hammer, notice how the hook, positioned halfway up the back of the hammer, engages the hook on the disconnector which is under upward pressure from the disconnector spring. Release the pressure on the trigger and the hammer. As the trigger is released, the hammer pivots forward until its cocking notch is caught by the sear surface on the front of the trigger. The functioning cycle is now complete and the rifle is ready to fire.

By performing this function test you are “proving” the disconnector. It must work in the manner described or the rifle is not safe to fire. It is very important that you understand fully how the disconnector works because you may have to make alterations to this part in order to get the greatest amount of benefit from the JP Adjustable Trigger. Study this function carefully until you are confident you understand how it works.
Now, use an appropriate Trigger Pull Gauge or Trigger Pull Weight Set and measure the weight of pull of the stock, unaltered, trigger mechanism. In our well-used test rifle, the pull weight varied from 6.5 to 7.5 pounds before any trigger work had been done. Always check the pull weight a number of times to make certain the hammer is setting up properly on the sear surface. A small bit of dirt, powder fouling, or brass shavings in the wrong place can give a false reading when checking a trigger pull.
(Also useful is a FF-46 Fine India Stone #657-246-246)
Following JP’s well-written instructions, I installed the new trigger into the lower receiver, along with the stock hammer and the new hammer and trigger springs.
(J.P. does point out that with some receivers, the trigger may have to be narrowed slightly to fit).
I adjusted the overtravel and sear screws, then installed the disconnector into the trigger. Lubrication on all parts was provided by using Brownells Action Lube Plus, a synthetic grease containing molybdenum disulfide.

On some lower receivers from various manufacturers, I have also had to relieve the front of the trigger hole in the bottom of the receivers. Relieving the front edge of this hole by approximately .125” with a medium cut, .250” diameter, parallel round file allows the J.P. trigger unit to insert easily into the receiver. If you do this carefully, you will not damage the exterior finish on the receiver and the modification will not show.
In our test rifle, the disconnector would not release the hammer when the trigger was pulled. I removed about .008″ from the front of the disconnector hook in accordance with JP’s instructions. I checked the trigger pull with the original hammer and J.P. springs installed, I recorded pull weights from 2 5¼8 pounds to 3 pounds over a series of fifteen tries. Remember, this was a well-used rifle that probably has over 5,000 rounds through the bore, plus an unknown number of dry-fire cycles. The original sear and hammer show quite a bit of wear!
Fitting the new J.P. Low Mass Hammer to the system gave a much cleaner, crisper feeling trigger pull, with pull weights from 23¼4 pounds to 3 pounds when cycled about twenty times. Before fitting the safety and trigger together, I replaced the upper receiver assembly, and dry fired the rifle about 30 times, using the bolt stop/release to jar the system by dropping the bolt with the trigger alternately held back to engage the disconnector and in the forward position to make sure the sear surface would catch the hammer.
If the hammer, sear and disconnect are functioning correctly, now you can fit the safety. Follow the safety-fitting instructions included with the kit. The safety on our rifle started to rotate but would not engage fully. I removed a slight amount of material from the safety fitting pad located on the top surface of the rear portion of the trigger (see photo above) with a Fine India Stone. I removed only a small amount of material at one time and tried the fit and safety function each time. Caution: You do not want to remove too much material from the safety fitting pad because this will ruin the part. So go slowly and try your fit each time. Only a small amount of material needed to be removed from the safety fitting pad on our trigger before the safety functioned correctly.
After fitting the safety, I disassembled the hammer and trigger from the lower, degreased the adjustment screws in the trigger, and used a drop of Loctite® #242, Blue Thread Locker on them. I then reassembled the trigger assembly into the receiver and re-adjusted the screws. Before the Loctite® set up, I re-checked the function of the parts both with the Hammer Drop Block and by dry firing as described earlier. Also check for proper safety function. The safety should rotate, engage and disengage easily and block all movement of the trigger. Again, check for the proper function of the hammer, trigger, sear and disconnector.
WARNING – If any of these parts fails to function properly as described in this article and in JP’s instructions, do not continue with the next step and do not function fire your rifle.
After allowing 24 hours for the Loctite® to set up, I repeated the safety check steps, then took a trip to the range for final testing.
The method I used was to first load a dummy round into the magazine, then a live round on top. After chambering the live round by feeding from the magazine, I fired the rifle. The extraction, ejection and feeding cycles of the fired empty case and dummy round worked “as advertised”.
I had no problems with the new trigger assembly. On each firing, the hammer was properly held by the disconnector and then the sear surface of the new JP trigger. This live/dummy exercise was repeated for five shots, then two live rounds and a dummy were loaded and fired, again with no problems.
After the test firing was done, I opened up the rifle and double checked that the Loctite® was properly holding the two adjustment screws. I gently attempted to turn them with the long-leg hex wrench that was supplied with the kit. Since there were no problems, the job was done except for cleaning!
I passed the rifle around to several of the Techs here in the office and they all found the J.P. Trigger to be vastly superior to the factory unit. Even if you use your AR-15 for casual plinking, you may want to consider this improvement because it’s just so much fun to shoot.
About:
Brownells is the world’s largest supplier of firearm parts, gunsmithing tools, equipment and accessories. Stocking more than 30,000 items, the company supplies armorers, gunsmiths, and shooters worldwide. All of their products are backed by a 100% satisfaction, unconditional, lifetime guarantee. For more information, or to place an order, call 800-741-0015 or visit Brownells.com .