The basics of building an AR 15 Upper receiver, it is a job that is easier than you may think.

USA – -(Ammoland.com)- Nosy and want to build your own AR 15 Upper Receiver from parts? Follow these expert tips and save time, money, stress, and enjoy the procedure and the creation. I will not hold anything back; stop procrastinating and start building an AR 15 Upper following this guide.
This is 2017, and the AR Upper Receiver is the buzzword in the firearms market. After eight or so tumultuous years impending gun control hanging overhead like the sword of Damocles in addition to a flourishing firearms economy, the market is teeming with AR Upper Receivers and related merchandises. Parts and fittings are relatively affordable and plenteous.
With pre-owned quality parts in abundance, putting them together and building the rifle you’ve always desired is as easy as ABC. Believe me; building your own AR Upper Receiver is not rocket science.
If you are a novice in the world of AR Upper Receivers, don’t get lost in the maze. There is an entire world of terminology, abbreviations, and alternatives for your new rifle. You need to know where to start. Don’t spend a dime before you think, or better still, learn from an expert.
Before opening your purse strings, have a clear objective in mind. Why are you building an AR Upper Receiver? Is it personal defense, hog hunting, competition or sandpit plinking? Maybe you want memorabilia you can show off to “the boys” when they come visiting.
These are all good and funky reasons to own an AR Upper Receiver; have your main objective at the back of your mind. Different parts exist to kit your AR Upper Receiver to accomplish virtually any mission you want to accomplish. Customize your rifle to address your individual needs.
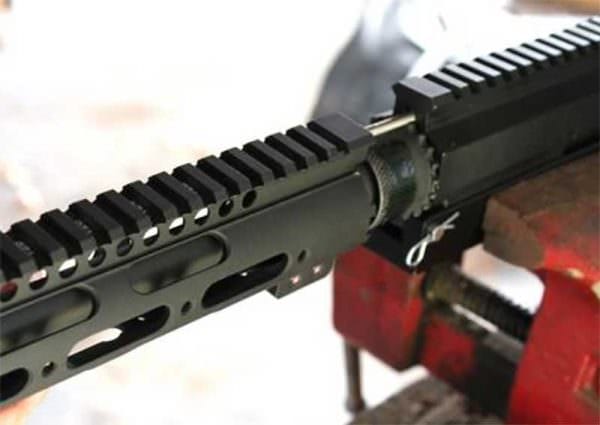
Equip yourself with a strong Bench Vice, a receiver block, an armor wrench, and a barrel nut wrench based on the type of handguard or rail you have. You will use the same punch and pin holder for the bolt catch pin for the forward assist installation.
1. Building an AR 15 Upper: Install the AR 15 Upper Receiver Forward Assist

If your AR 15 Upper Receiver doesn’t have a forward assist, you have to pop it in. There is a roll-pin that holds the entire assembly in place; this is a straightforward procedure. Position the flat side towards the outside and the bowed section towards the inside. Notice the recessed section removed from the forward assist, towards the bolt carrier, place the roll pin here to prevent the assembly popping out.
Once the forward assist is properly line up, daylight will be visible through the hole; bash the pin in place using a hammer. Give the forward assist a little jiggle every once in a while, nailing the pin in place to ensure the bowed out area snuggly aligns itself with the roll pin.
2. Install the AR15 Dust Cover

The dust cover is a headache, thanks to the spring. You want to position it, so it exerts pressure to the dust cover and ensures it doesn’t block the way while firing, and this is difficult. Insert half of the retaining rod with the dust cover on the gun before positioning the spring using the retaining rod itself. The short end is on the gun while the long end is on the dust cover.
3. Install the AR Rifle Barrel
The rifle barrel of the AR Upper Receiver isn’t just screwed in place; it’s attached to an extension of the barrel that is fixed using the barrel nut. You need to apply just enough torque to the barrel for everything to fall in place; the wrong amount of torque and the gun’s accuracy is ruined.
You need a Reaction Rod for this part; it comes a part of the armorer’s package and allows you to twist the AR Upper Receiver in any direction while everything else in the barrel remains perfectly in place. Use the vice to lock the sucker down, and you’re good to go.

Ensure the Reaction Rod’s slotted end sticks out when you place the Upper Receiver on the rod. The barrel should be aligned with the slotted end before mating the Upper Receiver with the barrel extension. Look for the small notch on the upper side of the Upper Receiver, for an alignment with the pin on the barrel extension; it holds the barrel and everything else in place.
Apply some lubricant to the Reaction Rod end before it goes into the barrel. Take care you don’t scratch the barrel extension due to the small clearances.
After coupling the two parts, place the barrel nut and lock everything in place. Put in some little lubricant on the thread of the Upper Receiver to ensure the process is smooth, and prevent the two materials from gnawing into each other.
4. AR-15 Barrel Nut Installation
The barrel nut couples the Upper Receiver with the barrel and also hosts the hand guards. Different manufacturers offer different specifications and instructions with regards to hand guards; the following is a general overview.

Timing the barrel nut onto the gun is essential. Start screwing the barrel nut using your hands before applying a calibrated torque wrench. Make sure it is perfectly aligned with the gas tube hole on the AR Upper Receiver, and only enough torque is applied. Otherwise, make appropriate adjustments following specific instructions.
There are kits that use screws while others use shims; the nuts are designed for either. Using the correct kit makes it easier for you to do proper timing. When everything gets in place, it is time to fix the gas tube, the last piece of the puzzle.
5. Install the Gas Tube
The gas tube is responsible for directing hot gasses out of the barrel to the gas key at the bolt carrier group; it’s the source of the energy that powers the action. Preparing and installing the gas tube is a walk in the park.
Start by pinning the gas tube in its rightful place on the gas block. This makes it easier for gas block to slide atop the barrier and create the connection between the gas tube and the port of the barrel.
Put the gas tube in such a way that the cut on one end of its side is parallel to the hole at the lower end of the gas block, before nailing everything into place. Once again, use the armor wrench to hold in place; nothing is easier.
After you pin the block and the gas tube together, you should now move to place them atop the barrel. Make sure that you align the gas block with the hole on the barrel and that the gas tube feeds through the barrel nut onto the AR Upper Receiver.
When you place a bolt carrier inside the gas tube, it should automatically slide into the gas key with no hassle. Putting the gas block in line is the easiest part of the entire process. Block the chamber using one finger before blowing into the muzzle to check that everything is where it ought to be.
You can know when you have done the right job based on the point where the resistance is felt. You should be able to tell what part is not in place.
6. Install the Hand Guards

Once again, what you do here depends on the particular manufacturer. There are hand guards that are screwed in while others are bolted. You now want to affix the hand guard on the barrel nut securely, and you are home and dry. (see related: Five Best Handguards )
7. Enjoy Your Handy from Building an AR 15 Upper.
Now that you identify the different parts of an AR Upper Receiver, and the steps to follow while building an AR 15 upper on your own, remember a safely check its functionality. If it didn’t work out the first time round, dismantle everything and give it a fresh start. Remember to check your State Laws with regards to firearms.

Thanks for the article Sam. I’m going to be doing my ground up ar build this winter and I’ve already started buying parts. You make it sound way easy, I hope it goes as easy for me. I’ll be looking up all my spec. stuff I need like for clearances and anything like that when I get started. So, thanks again for the article.
I noticed that the torque specs for the barrel nut were left out. I was taught that you need between 35 and 80 foot pounds. You should torque the barrel nut to 35 foot pounds first. Then, using a gas tube alignment guide, tighten the barrel nut just enough more to allow the guide to side through the next notch in the barrel nut.